WCAG 2.3.1 Flash Test: How to Test Websites for Seizure Hazards
- Spot triggers: Identify flashing UI components, animated GIFs, auto-play videos, or rapid re-rendering states.
- Interact actively: Trigger hover effects, focus states, and scroll actions while recording your browser window.
- Upload capture: Drag the screen recording into the Video Audit WCAG compliance analyzer.
- Locate violations: Use the waveform warnings and grid overlays to find the exact coordinates of failures.
Web accessibility is more than just contrast ratios and keyboard navigation. Under the Web Content Accessibility Guidelines (WCAG) 2.2 Success Criterion 2.3.1 (Three Flashes or Below Threshold), websites must be free of flashing animations and video content that could trigger photosensitive seizures.
Because web content is dynamic and interactive, testing it requires a clear process. This guide explains how to create screen recordings of potentially hazardous web animations and process them using the free Video Audit tool.
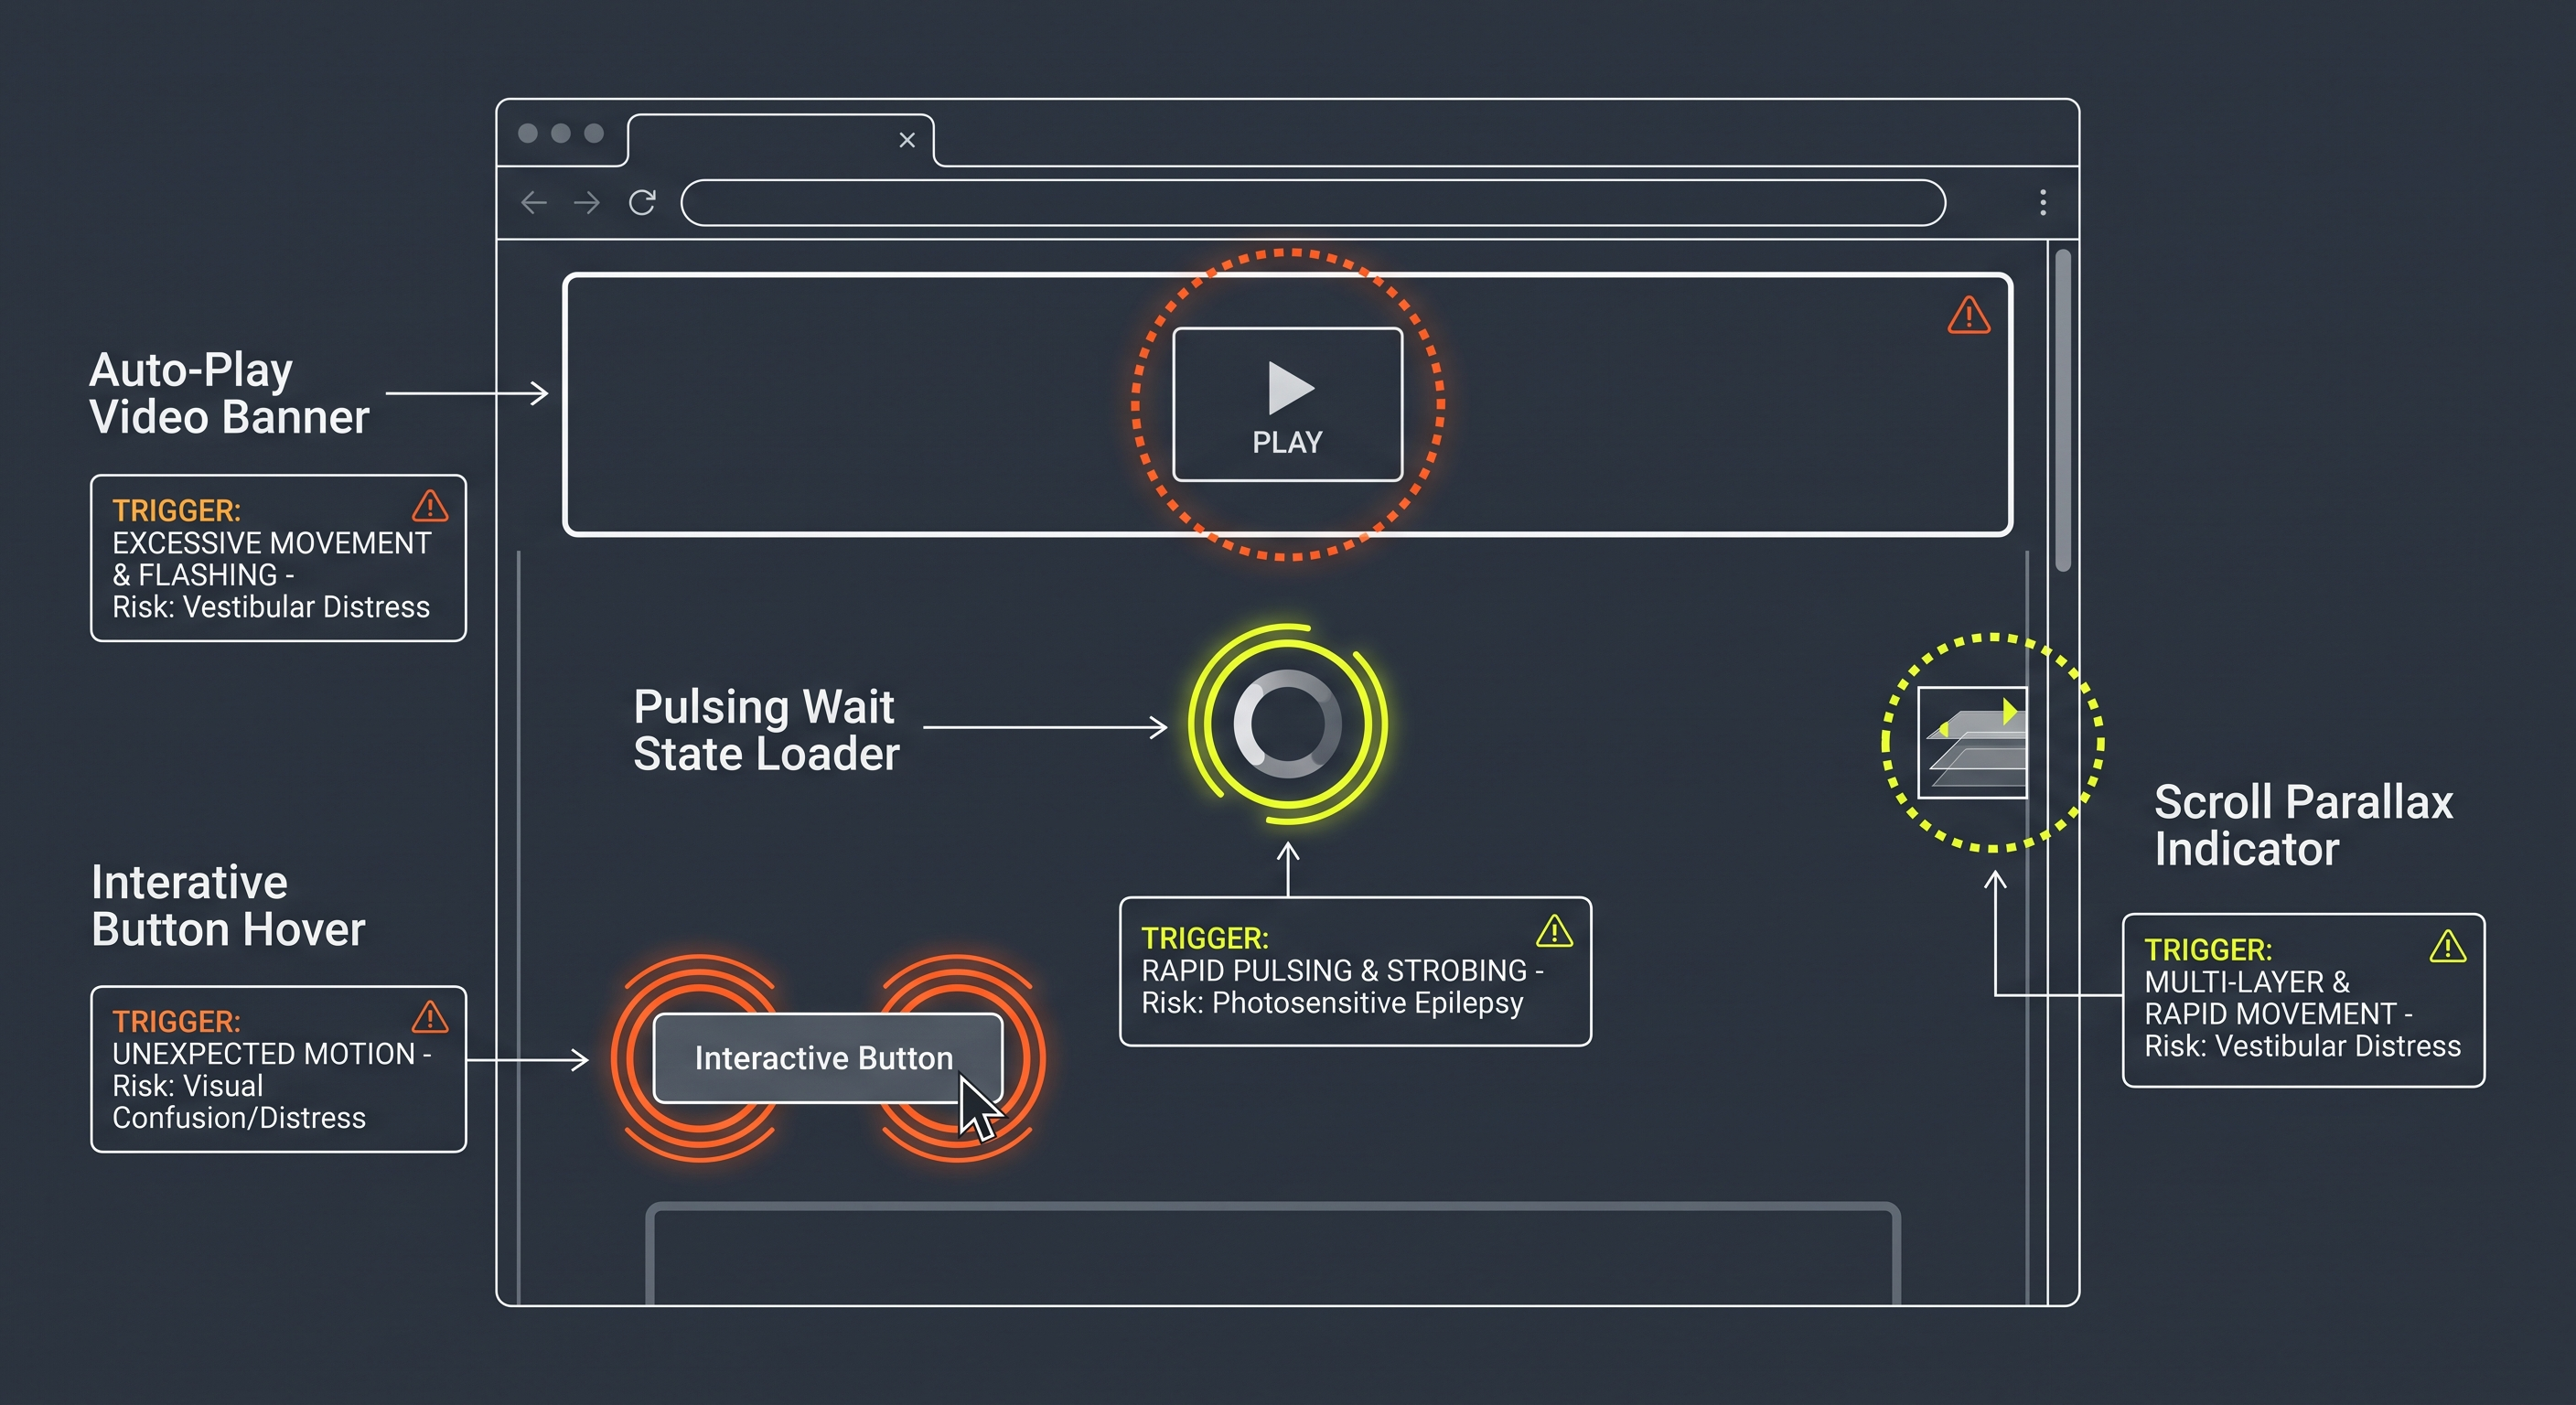 Figure 2: Common interactive triggers that bypass traditional static video safety checks.
#Why Web Content Needs Testing
Video files don't change after export, but websites change all the time. Common web elements that break WCAG 2.3.1 safety rules include:
Animated GIF Banners & Loops
An animated ad banner loops with hard cuts between light and dark frames. Slowing the loop keeps it from flashing more than three times per second.
Blinking Notification Badges
A dashboard badge blinks between two high-contrast colors to draw attention. The designer slows the blink rate so it stays under three flashes per second.
Strobing Loading Indicators
Fast-pulsing spinners or progress bars that flash more than three times per second during data loads.
Skeleton Screen Flicker
Skeleton loaders that rapidly flicker bright blocks on and off as data refreshes.
Auto-Playing Animations & Reduced Motion
Sites with auto-playing media should check prefers-reduced-motion and pause rapid transitions when enabled.
#Spotting Flashing Hazards
Look for sharp brightness changes over large areas. A tiny blinking cursor won't trigger a violation, but a large element swapping between light and dark values (10% or more relative brightness change) fails if it covers more than 25% of a pixel block.
Because these animations run live on the page, record your screen first to test them in Video Audit.
#Desktop vs. Mobile Layouts
Responsive designs change element sizes. Test both desktop and mobile views to find where a component takes up the most screen space.
- Mobile Views: Elements stack vertically on small screens. A flashing banner that takes up a small corner on desktop can fill the whole screen on mobile, crossing the 25% area limit.
- Desktop Views: Large hero sliders or full-width loaders cover huge pixel areas on wide monitors.
Record the layout where the component covers the largest percentage of the screen.
#Common Web Violation Examples
Here are three real-world examples of WCAG 2.3.1 violations and fixes:
#Example 1: Animated GIF ad banner
An animated GIF ad banner loops with hard cuts between light and dark frames.
- The trigger: A marketing banner loops with sudden cuts between white and dark backgrounds.
- The failure: Hard cuts alternating more than three times per second across a large banner fail WCAG 2.3.1.
- The fix: The creator slows the animation loop so it stays under three flashes per second.
#Example 2: Dashboard notification badge
A large notification badge on a dashboard blinks between two high-contrast colors to draw attention.
- The trigger: An alert badge toggles rapidly between bright white and deep red to get user attention.
- The failure (Hazardous Mode): Blinking faster than three times per second across a large badge creates rapid brightness shifts that break WCAG rules.
- The fix (Compliant Mode): The designer slows the blink rate to stay under three flashes per second.
Interactive Notification Badge
Compare hazardous fast flashing vs. remediated compliant blink rates:
#Example 3: Hero background video
Many homepages use auto-playing background video behind header text.
- The trigger: The video cuts rapidly between bright outdoor scenes and dark indoor shots, or uses light leaks and strobe effects.
- The failure: Because the background video fills most of the screen, rapid cuts covering over 25% of the visual field fail the test if they happen more than three times in a second.
#Example 4: Respecting reduced motion preferences
A site with auto-playing animations checks the user's prefers-reduced-motion setting.
- The trigger: Auto-playing hero loops or background video run continuously on page load.
- The failure: Auto-playing visual flashes run without checking user motion settings.
- The fix: The site reads
prefers-reduced-motionand automatically pauses animations and cuts out rapid transitions when active.
#Step 1: Record the Website Content
To test a web page, you must create a screen recording of the potentially flashing elements or user flows.
#Tips for High-Quality Capture:
- Choose your recording area: You can record either a specific area where you suspect a hazard or the whole screen. However, remember that the WCAG standard is based on a 10-degree visual field (mapped to a pixel subarea at standard viewing distance), not the size of the whole screen or crop. Recording the entire browser window gives the most accurate results.
- Use Native Framerates: Set your recording software to record at least . Recording at low framerates (like ) can miss high-frequency flashes, leading to a false pass.
- Choose High Quality: Avoid heavy video compression or low bitrates. Compression artifacts can smooth out sharp contrast changes, altering the brightness calculations.
- Record the content:
- For Auto-play Videos and GIFs: Let the video or GIF run for at least 5 to 10 seconds to capture its full loop.
- For Blinking Notification Badges: Record the dashboard or UI area while the notification badge is actively blinking.
- For Motion & Transition Controls: Verify and record how auto-playing media behaves when
prefers-reduced-motionis enabled versus disabled.
#Step 2: Upload and Analyze the Video
Open the free Video Audit tool after saving your screen recording.
- Select the File: Drag the screen recording file into the upload zone.
- Apply WCAG 2.2 Standard: Ensure the standard is set to WCAG (which checks for Criterion 2.3.1 compliance).
- Run the Scanner: Click Analyze Video. The engine decodes the frames locally inside your browser, analyzing every pixel over time.
#Step 3: Interpret Web Violations
If the analyzer detects a violation, use the results screen to find the failing element on the page.
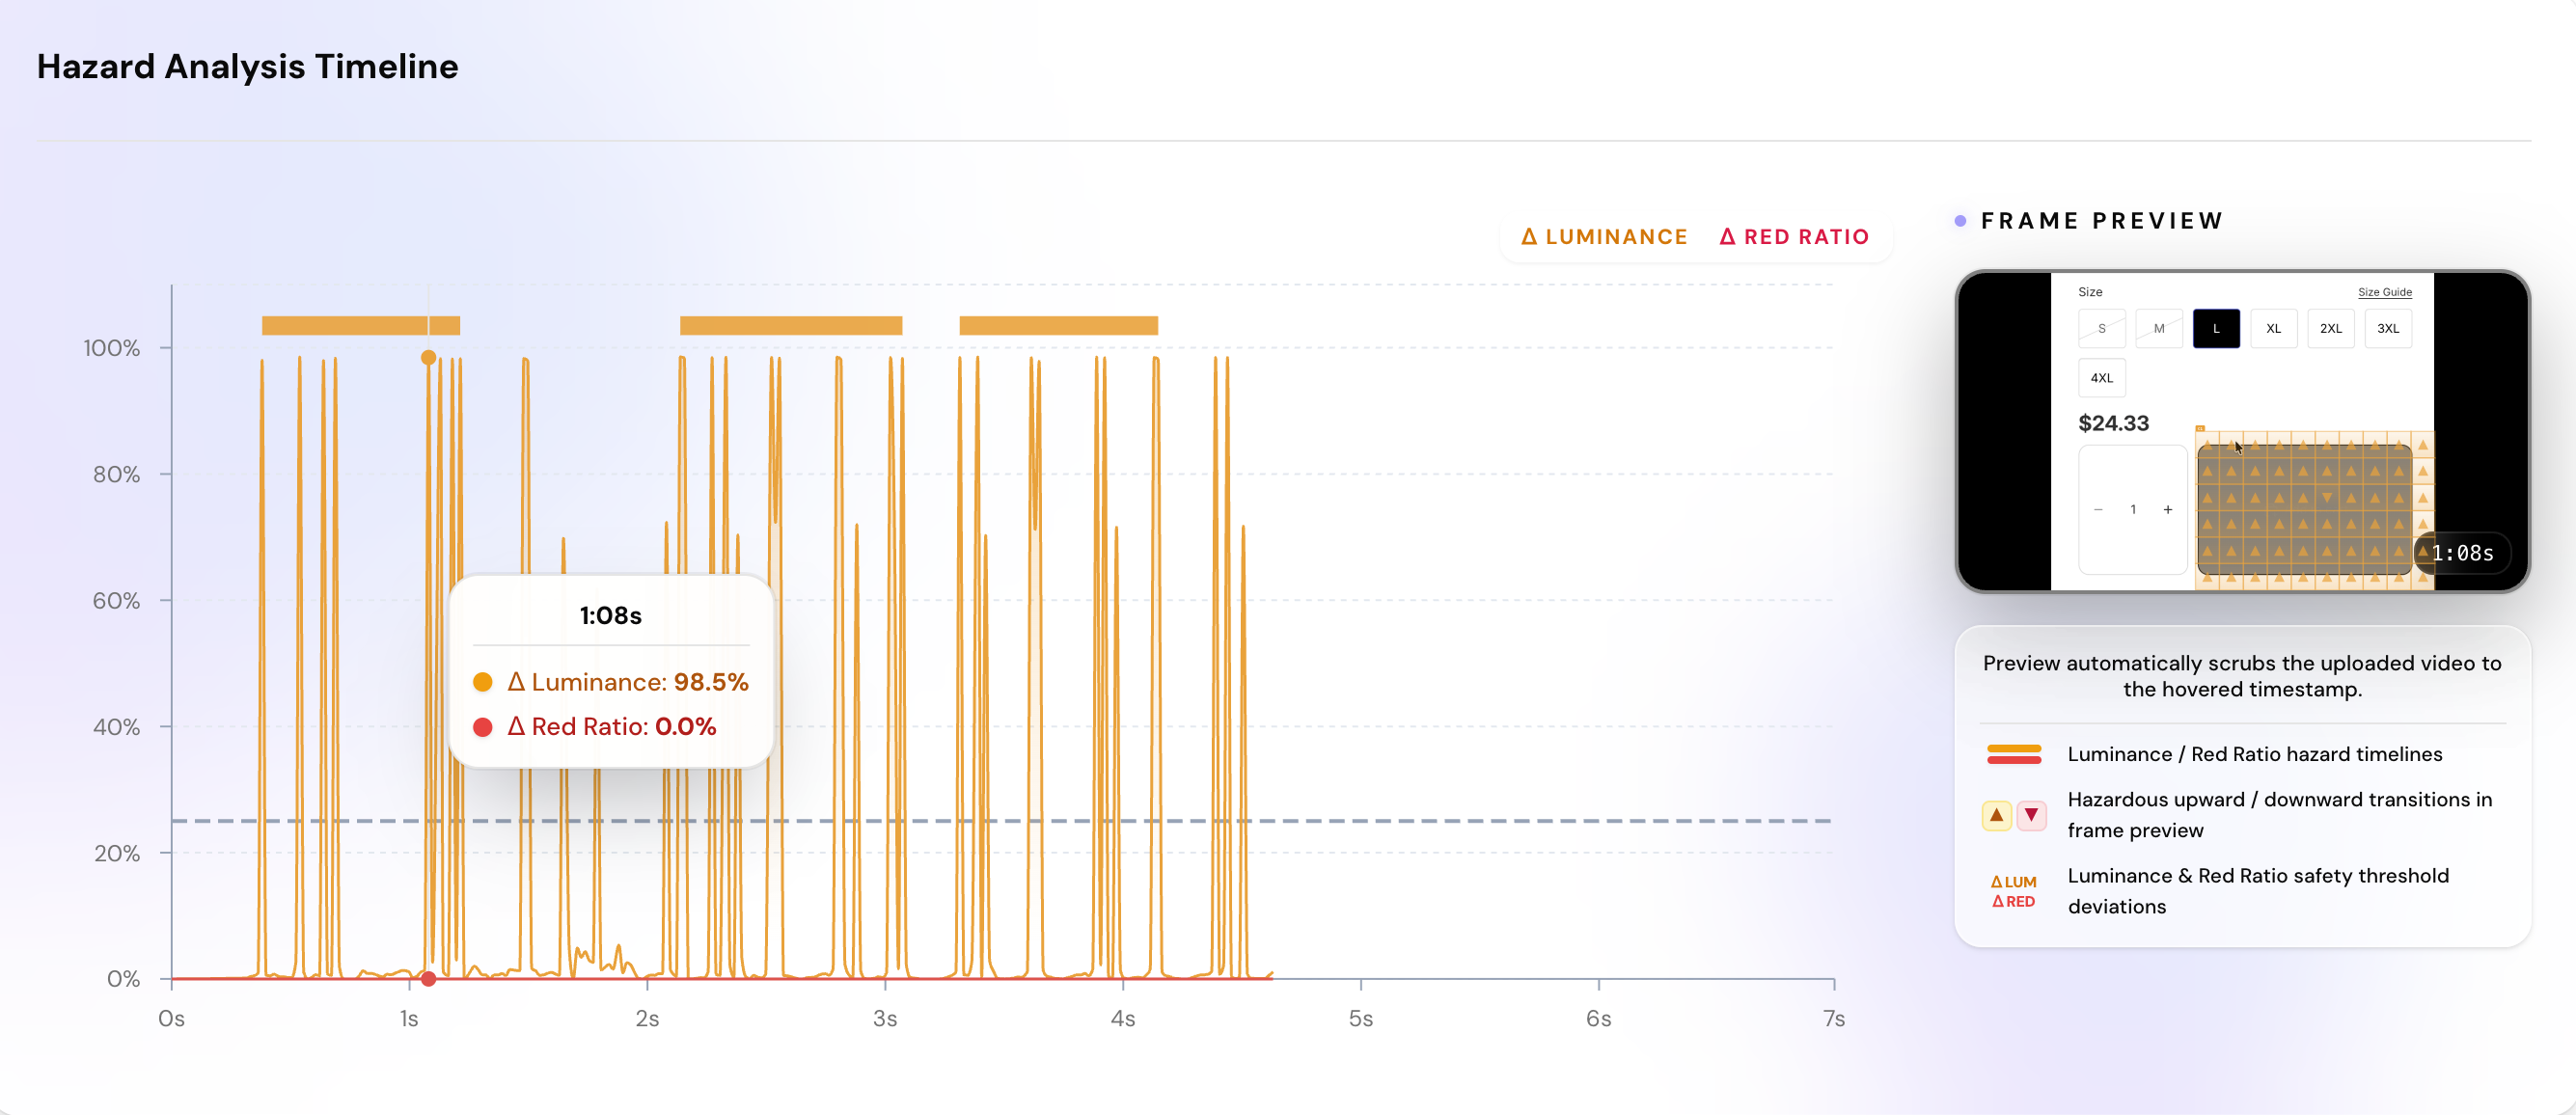 Figure 3: Using Flash Zone overlays to isolate the flashing UI element.
#1. Identify the Failing Timecode
Scroll to the warning indicators on the timeline chart. Look at whether the failure is a Luminance Flash (overall brightness shifts) or a Saturated Red Flash (high-contrast red transitions).
#2. Locate the Element using Flash Zones
The video preview displays red bounding boxes (Flash Zones) directly over the flashing region. Since you recorded your browser window, these boxes will align exactly with the badge, GIF, or banner that caused the failure.
#3. Verify the Spatial Size
Compare the hazard area size in the log. If a flashing element is large (occupying more than 25% of a CSS pixel area), it fails the compliance checks.
#How to Fix Website Violations
If your website fails compliance, web content teams and developers can fix it without removing animation entirely. Apply these general design adjustments:
- Lower the Contrast: Avoid elements that snap between extreme light and dark states. Soften the contrast changes or add a brief transition fade effect to eliminate the sudden edge of the flash.
- Slow Down the Pace: Keep loading indicators, progress skeletons, and transition animations slow and steady. A smooth, continuous movement is always safer than a fast pulse.
- Add Play/Pause Controls: Give users a way to stop any auto-playing media, slide carousels, or animated GIFs.
- Respect Motion Preferences: Implement checks to disable large scroll animations, parallax effects, or auto-playing background headers when users have set their system preferences to request reduced motion.
#Conclusion: Continuous Accessibility Auditing
Manual compliance checking is a great start for single landing pages. However, for web applications with hundreds of pages and constant updates, you need automated tests.
With our upcoming Enterprise API, you can scan recordings automatically during headless browser tests to verify compliance with every deployment.
#Frequently Asked Questions
For macOS, QuickTime Player provides high-quality screen recording. For Windows, OBS Studio or the built-in Snipping Tool screen recorder are recommended. Ensure the recording framerate is set to at least 30fps to match standard display refresh rates.